If you’re a mountain-only type of person, this post will do one of two things for you- bore you to death and make you never come back, or be oddly fascinating as to why someone would take this sort of time to prepare wheels and tires just for road racing (in all fairness, tubular CX wheels/tires are used almost exclusively by serious CX racers, and tubular mountain bike wheels/tires do exist, they just aren’t that common).
A long time ago in a galaxy far, far away, all bike tires were tubular. I’ll spare you the explanation of what that means since Google is your friend, and just say that now, they’re generally only used in road, tri, and Cyclocross (and occasional MTB) racing. Gluing a tubular tire to a rim is a process that seems to mystify a lot of people. Do it right, and you have a very safe, reliable, lightweight, and incredibly buttery-feeling ride. Do it wrong, and your tire could come off of the rim, and you could wind up seriously injured.
So, let’s first go over what you can do that’s “wrong.”
-Not use enough glue
-Not apply the glue evenly/leave dry spots on the rim and/or basetape
-Not make sure that the basetape is pressed all the way into the center “well” of the rim when you install the tire
-Not prep the basetape/rim surfaces before applying glue
– Make a mess/install the tire backwards (won’t kill you, but doesn’t look pro, either)
Here’s how I avoid those things. Disclaimer- if you are currently searching the internet for “how to glue tubulars,” you’re likely to find different methods that will yield the same result- a well-glued tire. There is absolutely nothing wrong with any of those as long as the end product is the same. Heck- Poolboy Matt does it differently, and I’m about to race a set tomorrow that he glued for me last season. The important thing is, whatever method you choose, you avoid the things I mentioned above.
Supplies- acid brushes (available in the plumbing section of the hardware store), Acetone, Goof-Off, latex or nitrile gloves, truing stand, glue (I like Vittoria Mastik One), a skinny broomstick, and a helper for step 6.
1. Prep the tire. The night before you’re going to glue, put the tire on the rim dry and inflate it to 120psi. That will stretch it out a little and make it easier to install once it’s glued.
2. Prep the gluing surfaces. Wipe the rim and basetape of the tire down with some acetone. If there’s old glue on the rim, that’s ok as long as it’s not clumpy and messy. I usually soak those spots in a little acetone, which softens the glue and makes it “melt” a little into the fresh glue you apply to the rim.
3. Put electrical tape on the brake track of the rim. Trust me- It makes everything soooooo much cleaner.
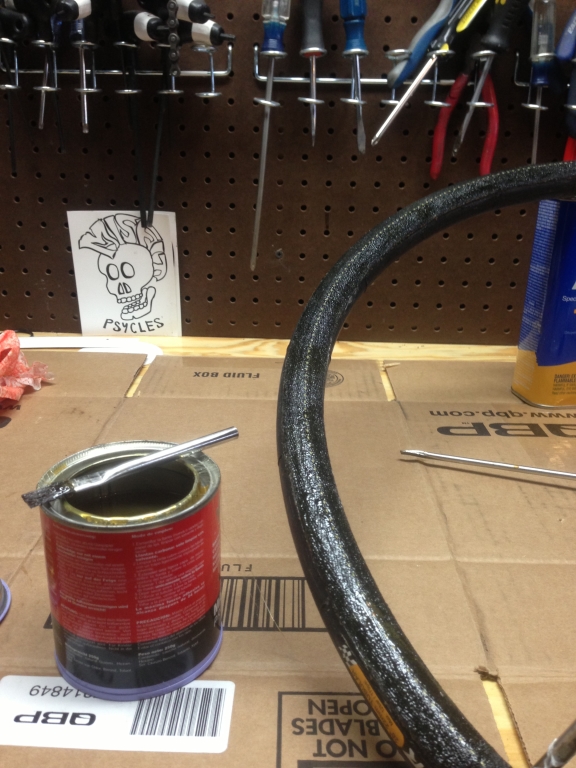
4. First coat of glue. Inflate your tire enough that it starts to roll inside-out. Add air until you can lay it on a clean counter and the basetape faces up. It’ll look like this:

(instagram it for added “hipness”)
Wear your gloves, and brush the glue on a little at a time, being sure to get it all the way to the edges of the basetape without going over. You want every millimeter of it to have glue on/in it. When you’re done, put it someplace out of the way so it can dry.
Put your wheel in the truing stand. Put a similar coat of glue on it Be sure that the glue is smooth and even from wall-to-wall on the rim. Leave it in the stand to dry. Keep cats away from it.
5. I give everything at least three hours to dry, but it won’t hurt to go longer (some people say overnight). At that point, evaluate as to whether or not you need another coat of glue on both surfaces…
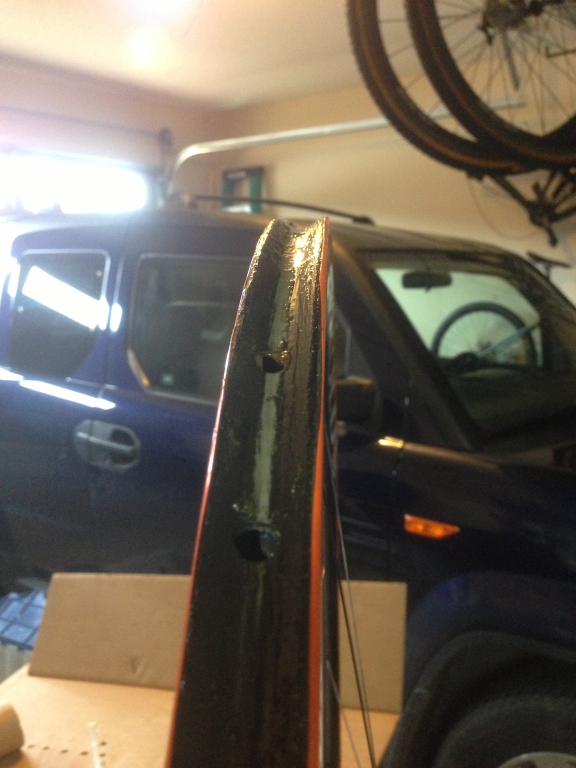
-Basetape: some basetape is very “thirsty,” like the Conti in these pictures. I ALWAYS go with 2 coats on a very absorbent basetape. Tires like a Zipp tubular have a much less absorbent basetape, and, you’ll find that the glue you applied is already giving you a nice, solid sheen. This is where your judgement comes into play. If in doubt, apply another coat of glue and allow it to dry, just like you did before. It should end up looking like this:
-Rim: Here’s another judgement call on your part. If you’re gluing a wheel/tire for road & crit racing, put another coat of glue onto the rim. In those situations, you’ve generally got more brake heat and turning force applied to the rim/tire. Also, someone who flats a tire in either of those situations is going to remove their wheel and get a spare from the pit/wheel truck. In most triathlons, not only will the the wheel/tire not be subjected to the same severe turning/brake heating forces as, say, a road-racing criterium, but also, if the rider flats, he/she will generally need to be able to remove the tire on the side of the road and install their spare. If you put another coat of glue on the rim, it’s going to be close to impossible to take the tire off without a lot of time and herculean effort. If in doubt, apply another coat and let it dry. It should look nice & smooth, wall-to-wall, like this:
6. At this point, you have 2 dry surfaces with “enough” glue on them. The last coat of glue is a very thin one, only applied to the rim. Once you’ve done that, let the air out of your tire and call in your helper. Set the rim on a clean surface on the ground (I use a piece of cardboard on the floor). Stick the valve through (you remembered your valve extender, right?), and pull outward/down on the tire (making sure to keep the basetape centered on the rim) to wrap it around the rim and give yourself as much “slack” as possible for the last bit of tire. (If this doesn’t make sense, search youtube… I’m sure you can find a few videos there.) When you get to the last section of tire, you want to try your best to grab it and pull it over the edge of the rim rather than rolling the tire surface and sidewall through the glue- this is where an extra set of hands is very helpful.
7. Once your tire is installed, add just enough air to give it shape. Put it in the truing stand and start working your way around the to make sure that the tire is centered on the rim. Some people use the feelers on the truing stand to look for any wobbles. Whatever works for you.
8. Once it’s centered all the way around, uninflate the tire. Lay your broomstick on the floor and roll the tire over it to insure good contact between the basetape and the rim. This is ESPECIALLY important if your rim has a very deep “well” in the middle. I usually make several passes, using my bodyweight to press down and really make the basetape and rim stick.
9. Inflate the tire to 120psi. Remove the electrical tape and use acetone & goof-off to clean up any excess glue.
10. Bask in the glow of a gorgeous job. Install wheels on bike and go kick everyone’s butt.
You lost me at “Hello”.
Think I’ll stick with clinchers!
That’s exactly why BoneCrusher switched to clinchers years ago and will NEVER go back…..